Learn how Linux/FFmpeg C partial codebase is organized to be extensible and act as if it were meant to have “polymorphism”. Specifically, we’re going to briefly explore how Linux concept of everything is a file works at the source code level as well as how FFmpeg can add support fast and easy for new formats and codecs.
Good software design – Introduction
To write useful and long term maintainable software we tend to look out for patterns and group them into abstractions and it seems that’s the case for devs behind Linux and FFmpeg too.
Software design
When we’re creating software, we’re building data structures and defining their behaviors and dependencies. The way we create and link them can be seen as the design/architecture of the software.
Let’s say we’re building a media framework that encodes/decodes video and audio. The codecs AV1, H264, HEVC, and AAC all do some common operations and if we can provide a generic abstraction that holds these common operations and data we can use this concept instead of relying on the concrete idea of what a specific codec does.
Through the years many developers noticed that software with a good design is a good idea that pays off as software grows in complexity.
This is one of the ideas behind the good design for software, to rely on components that are weakly linked and with boundaries around what it should do.
Ruby
Maybe it’s easier to see all these concepts in practice. Let’s code a quick pseudo media stream framework that provides encoding and decoding for several codecs.
This file contains hidden or bidirectional Unicode text that may be interpreted or compiled differently than what appears below. To review, open the file in an editor that reveals hidden Unicode characters.
Learn more about bidirectional Unicode characters
| class AV1 | |
| def encode(bytes) | |
| end | |
| def decode(bytes) | |
| end | |
| end | |
| class H264 | |
| def encode(bytes) | |
| end | |
| def decode(bytes) | |
| end | |
| end | |
| # … | |
| supported_codecs = [AV1.new, H264.new, HEVC.new] | |
| class MediaFramework | |
| def encode(type, bytes) | |
| codec = supported_codecs.find {|c| c.class.name.downcase == type} | |
| codec.encode(bytes) | |
| end | |
| end |
This pseudo-code in ruby tries to recreate what we’re discussing above, there is an implicit concept here of what operations a codec must have, in this case, the operations are encode and decode. Since ruby is a dynamically typed language any class can present these two operations and act as a codec for us.
Developers sometimes may use the words: contract, API, interface, behavior and operations as synonyms.
This design might be considered good because if we want to add a new codec we just need to provide an implementation and add it to the list, even the list could be built in a dynamic way but the idea is that this code seems easy to extend and maintain because it tries to keep link between the components weak (low coupling) and each component does only what it should do (cohese).
Rails framework even enforce some way to organize the code, it adopts the model-view-controller (MVC) architecture
Golang
When we go (no pun intended) to a statically typed language like golang we need to be more formal, describing the required types but it’s still doable.
This file contains hidden or bidirectional Unicode text that may be interpreted or compiled differently than what appears below. To review, open the file in an editor that reveals hidden Unicode characters.
Learn more about bidirectional Unicode characters
| type Codec interface { | |
| Encode(data []int) ([]int, error) | |
| Decode(data []int) ([]int, error) | |
| } | |
| type H264 struct { | |
| } | |
| func (H264) Encode(data []int) ([]int, error) { | |
| // … lots of code | |
| return data, nil | |
| } | |
| var supportedCodecs := []Codec{H264{}, AV1{}} | |
| func Encode(codec string, data int[]) { | |
| // here we can chose e use | |
| // supportedCodecs[0].Encode(data) | |
| } |
The interface type in golang is much more powerful than Java’s similar construct because its definition is totally disconnected from the implementation and vice versa. We could even make each codec a ReadWriter and use it all around.
Clang
In the C language we still can create the same behavior but it’s a little bit different.
This file contains hidden or bidirectional Unicode text that may be interpreted or compiled differently than what appears below. To review, open the file in an editor that reveals hidden Unicode characters.
Learn more about bidirectional Unicode characters
| struct Codec | |
| { | |
| *int (*encode)(*int); | |
| *int (*decode)(*int); | |
| }; | |
| *int h264_encode(int *bytes) | |
| { | |
| // … | |
| } | |
| *int h264_decode(int *bytes) | |
| { | |
| // … | |
| } | |
| struct Codec av1 = | |
| { | |
| .encode = av1_encode, | |
| .decode = av1_decode | |
| }; | |
| struct Codec h264 = | |
| { | |
| .encode = h264_encode, | |
| .decode = h264_decode | |
| }; | |
| int main(int argc, char *argv[]) | |
| { | |
| h264.encode(argv[1]); | |
| } |
Code inspired by https://www.bottomupcs.com/abstration.xhtml
We first define the abstract operations (functions in this case) in a generic struct and then we fill it with the concrete code, like the av1 decoder and encoder real code.
Many other languages have somewhat similar mechanisms to dispatch methods or functions as if they were part of an agreed protocol and then the system integration code can deal only with this high-level abstractions.
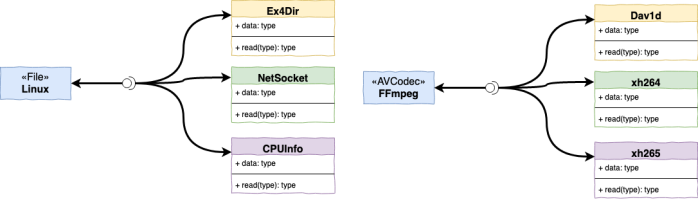
Linux Kernel – Everything is a file
Have you ever heard the expression everything is a file in Linux? The idea is to have a common interface for all kinds of resources in Linux, for instance, Linux handles network socket, special files (like /proc/cpuinfo) or even USB devices as files.
This is a powerful idea that can make easy to write or use programs for linux since we can rely in a set of well known operations from this abstraction called file. Let’s see this in action:
This file contains hidden or bidirectional Unicode text that may be interpreted or compiled differently than what appears below. To review, open the file in an editor that reveals hidden Unicode characters.
Learn more about bidirectional Unicode characters
| # the first case is the easiest, we're just reading a plain text file | |
| $ cat /etc/passwd | |
| root:x:0:0:root:/root:/bin/bash | |
| daemon:x:1:1:daemon:/usr/sbin:/usr/sbin/nologin | |
| … | |
| # now here, we think we're reading a file but we are not! (technically yes.. anyway) | |
| $ cat /proc/meminfo | |
| MemTotal: 2046844 kB | |
| MemFree: 546984 kB | |
| MemAvailable: 1535688 kB | |
| Buffers: 162676 kB | |
| Cached: 892000 kB | |
| # and finally we open a file (using fd=3) for read/write | |
| # the "file" being a socket, we then send a request to this file >&3 | |
| # and we read from this same "file" | |
| $ exec 3<> /dev/tcp/www.google.com/80 | |
| $ printf 'HEAD / HTTP/1.1\nHost: http://www.google.com\nConnection: close\n\n' >&3 | |
| $ cat <&3 | |
| HTTP/1.1 200 OK | |
| Date: Wed, 21 Aug 2019 12:48:40 GMT | |
| Expires: -1 | |
| Cache-Control: private, max-age=0 | |
| Content-Type: text/html; charset=ISO-8859-1 | |
| P3P: CP="This is not a P3P policy! See g.co/p3phelp for more info." | |
| Server: gws | |
| X-XSS-Protection: 0 | |
| X-Frame-Options: SAMEORIGIN | |
| Set-Cookie: 1P_JAR=2019-08-21-12; expires=Fri, 20-Sep-2019 12:48:40 GMT; path=/; domain=.google.com | |
| Set-Cookie: NID=188=K69nLKjqge87Ymv4h-gAW_lRfLCo7-KrTf01ULtY278lUUcaNxlEqXExDtVB104pdA8CLUZI8LMvJv26P_D8RMF3qCDzLTpjji96B9v_miGlZOIBro6pDreHP0yW7dz-9myBfOgdQjroAc0wWvOAkBu-zgFW_Of9VpK3IfIaBok; expires=Thu, 20-Feb-2020 12:48:40 GMT; path=/; domain=.google.com; HttpOnly | |
| Accept-Ranges: none | |
| Vary: Accept-Encoding | |
| Connection: close |
This only is possible because the concept of a file (data structure and operations) was design to be one of the main way to communicate among sub-systems. Here’s a gist of the file_operations’ API.
This file contains hidden or bidirectional Unicode text that may be interpreted or compiled differently than what appears below. To review, open the file in an editor that reveals hidden Unicode characters.
Learn more about bidirectional Unicode characters
| struct file_operations { | |
| struct module *owner; | |
| loff_t (*llseek) (struct file *, loff_t, int); | |
| ssize_t (*read) (struct file *, char __user *, size_t, loff_t *); | |
| ssize_t (*write) (struct file *, const char __user *, size_t, loff_t *); | |
| //… | |
| } |
The struct file_operations define what one should expect from a concept of what file can do.
This file contains hidden or bidirectional Unicode text that may be interpreted or compiled differently than what appears below. To review, open the file in an editor that reveals hidden Unicode characters.
Learn more about bidirectional Unicode characters
| const struct file_operations ext4_dir_operations = { | |
| .llseek = ext4_dir_llseek, | |
| .read = generic_read_dir, | |
| //.. | |
| }; |
Here we can see the directory implementation of these operations for the ext4 file system.
This file contains hidden or bidirectional Unicode text that may be interpreted or compiled differently than what appears below. To review, open the file in an editor that reveals hidden Unicode characters.
Learn more about bidirectional Unicode characters
| static const struct file_operations proc_cpuinfo_operations = { | |
| .open = cpuinfo_open, | |
| .read = seq_read, | |
| .llseek = seq_lseek, | |
| .release = seq_release, | |
| }; |
And even the cpuinfo proc files is done over this abstraction. When you’re operating files under linux you’re actually dealing with the VFS system, this system delegates to the proper implementation file implemenation.

Source: https://ops.tips/blog/what-is-that-proc-thing/
FFmpeg – Formats
Here’s an overview of FFmpeg flow/architecture that shows that the internal componets are linked mostly to the abstract concepts like AVCodec but not directly to their implemenation, H264, AV1 or etc.
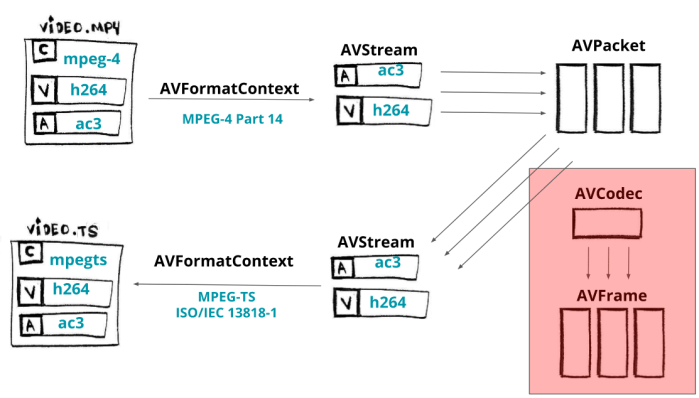
For the input files, FFmpeg creates a struct called AVInputFormat that is implemented by any format (video container) that wants to be used as an input. MKV files fill this structure with its implementation as the MP4 format too.
This file contains hidden or bidirectional Unicode text that may be interpreted or compiled differently than what appears below. To review, open the file in an editor that reveals hidden Unicode characters.
Learn more about bidirectional Unicode characters
| typedef struct AVInputFormat { | |
| const char *name; | |
| const char *long_name; | |
| const char *extensions; | |
| const char *mime_type; | |
| ff_const59 struct AVInputFormat *next; | |
| int raw_codec_id; | |
| int priv_data_size; | |
| int (*read_probe)(const AVProbeData *); | |
| int (*read_header)(struct AVFormatContext *); | |
| } | |
| // matroska | |
| AVInputFormat ff_matroska_demuxer = { | |
| .name = "matroska,webm", | |
| .long_name = NULL_IF_CONFIG_SMALL("Matroska / WebM"), | |
| .extensions = "mkv,mk3d,mka,mks", | |
| .priv_data_size = sizeof(MatroskaDemuxContext), | |
| .read_probe = matroska_probe, | |
| .read_header = matroska_read_header, | |
| .read_packet = matroska_read_packet, | |
| .read_close = matroska_read_close, | |
| .read_seek = matroska_read_seek, | |
| .mime_type = "audio/webm,audio/x-matroska,video/webm,video/x-matroska" | |
| }; | |
| // mov (mp4) | |
| AVInputFormat ff_mov_demuxer = { | |
| .name = "mov,mp4,m4a,3gp,3g2,mj2", | |
| .long_name = NULL_IF_CONFIG_SMALL("QuickTime / MOV"), | |
| .priv_class = &mov_class, | |
| .priv_data_size = sizeof(MOVContext), | |
| .extensions = "mov,mp4,m4a,3gp,3g2,mj2", | |
| .read_probe = mov_probe, | |
| .read_header = mov_read_header, | |
| .read_packet = mov_read_packet, | |
| .read_close = mov_read_close, | |
| .read_seek = mov_read_seek, | |
| .flags = AVFMT_NO_BYTE_SEEK | AVFMT_SEEK_TO_PTS, | |
| }; |
This design allows new codecs, formats, and protocols to be integrated and released easier. DAV1d (an av1 open-source implementation) was integrated into FFmpeg May this year and you can follow along the commit diff to see how easy it was. In the end, it needs to register itself as an available codec and follow the expected operations.
This file contains hidden or bidirectional Unicode text that may be interpreted or compiled differently than what appears below. To review, open the file in an editor that reveals hidden Unicode characters.
Learn more about bidirectional Unicode characters
| +AVCodec ff_libdav1d_decoder = { | |
| + .name = "libdav1d", | |
| + .long_name = NULL_IF_CONFIG_SMALL("dav1d AV1 decoder by VideoLAN"), | |
| + .type = AVMEDIA_TYPE_VIDEO, | |
| + .id = AV_CODEC_ID_AV1, | |
| + .priv_data_size = sizeof(Libdav1dContext), | |
| + .init = libdav1d_init, | |
| + .close = libdav1d_close, | |
| + .flush = libdav1d_flush, | |
| + .receive_frame = libdav1d_receive_frame, | |
| + .capabilities = AV_CODEC_CAP_DELAY | AV_CODEC_CAP_AUTO_THREADS, | |
| + .caps_internal = FF_CODEC_CAP_INIT_THREADSAFE | FF_CODEC_CAP_INIT_CLEANUP | | |
| + FF_CODEC_CAP_SETS_PKT_DTS, | |
| + .priv_class = &libdav1d_class, | |
| + .wrapper_name = "libdav1d", | |
| +};` |
No matter the language we use we can (or at least try to) build a software with low coupling and high cohesion in mind, these two basic properties can allow you to build easier to maintain and extend software.


You must be logged in to post a comment.