Create software from “scratch” might not be a good idea at first but it’s often a great way to study a specific technology or even to deepen your knowledge in a particular field of computer science.
In this three-post series, we’re going to build a simple video platform using open-source software, will add features to it so it handles the computional power on the front end (edge computing) and we’ll conclude designing a platform that will enable us to add code/features dynamically to the servers.
An over-the-top (OTT) is a streaming media service offered directly to viewers via the Internet. OTT bypasses cable, broadcast, and satellite television platforms. Nowyoudon’t needto spendyour money that much.
Edge computing is the ability to put computation and storage closer to the place where it is demanded, in simpler terms is the code running within your front end servers.
We’re going to design two distinct services: a simple video streaming solution and an edge computing platform for this video streaming service.
The new OTT is a VERY SIMPLE open-source video platform that expects an input signal and produces an output stream. It was made mostly as an excuse to discuss and design an edge computing platform around it.
NOTT is built using a simple html5 app
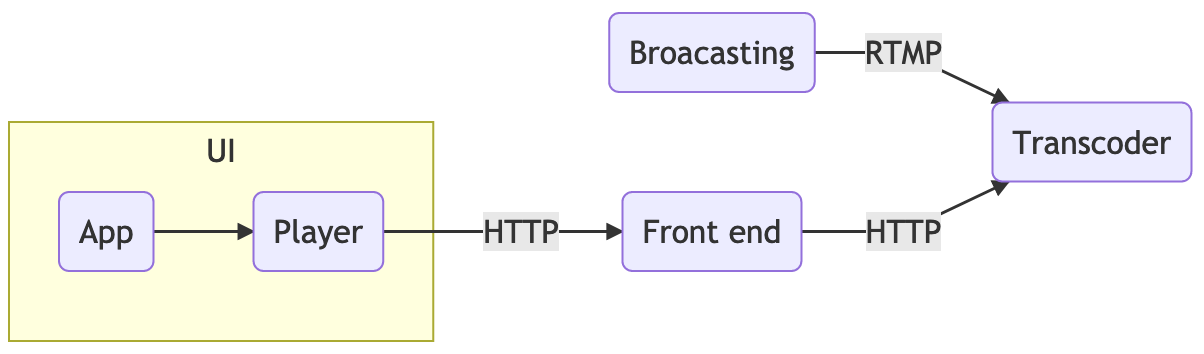
NOTT architecture
The UI app is a simple static html5 file served from nginx. We’re using Clappr (backed by hls.js and shaka) as the selected player. The front end works as a caching layer for the video streaming and it also hosts the NOTT app.
The live streaming reaches the platform through FFmpeg, the broacasting, which is also used to transcode the input producing multiple renditions. The nginx-rtmp acts as a packager, converting the RTMP input into the adaptive output streaming format known as HLS.
The main selling point of our OTT platform is that it has the popular TV channel color bar (60fps) and the legendary TV show big buck bunny (partner’s licensed content).
Compatibility: I didn’t test on all platforms (browsers, ios, android, CTVs), video is hard and NOTT won’t cover 100% of the devices but it should work in most places.
How does it work?
To broadcast the color bar TV show into the platform, we’ll use FFmpeg. It has some filters that are capable to create synthetic color bar frames at a given rate. It also offers an audio source filter known as sine can be used to create artificial sound.
This command creates color bar pictures at 60 frames per second and a sine wave sound at 48000 hertz. It encodes them to the video codec h264 using the libx264 and to the audio codec aac. Finally, we send them to the transcoder/packager using RTMP.
This file contains hidden or bidirectional Unicode text that may be interpreted or compiled differently than what appears below. To review, open the file in an editor that reveals hidden Unicode characters.
Learn more about bidirectional Unicode characters
The ingest server runs nginx-rtmp and it acts as input service, receiving the FFmpeg synthetic stream. It also transcodes (spawning FFmpeg processes for that) and creates the HLS format in a given folder.
The front end servers will consume the streaming via HTTP backed by this ingest server.
This file contains hidden or bidirectional Unicode text that may be interpreted or compiled differently than what appears below. To review, open the file in an editor that reveals hidden Unicode characters.
Learn more about bidirectional Unicode characters
The front end server we chose was nginx, a scalable web server and reverse proxy. This will be the endpoint where the final users can access the html5 application to watch the stream. It will also work as a caching layer for scalability.
This file contains hidden or bidirectional Unicode text that may be interpreted or compiled differently than what appears below. To review, open the file in an editor that reveals hidden Unicode characters.
Learn more about bidirectional Unicode characters
Finally, the app is a simple HTML static file that instantiates the player.
This file contains hidden or bidirectional Unicode text that may be interpreted or compiled differently than what appears below. To review, open the file in an editor that reveals hidden Unicode characters.
Learn more about bidirectional Unicode characters
The entire platform was conceived with Linux containers in mind so you just need to run make run and this is going to start it all. You also need to start the color bar in a different tab by running make broadcast_tvshow and point your browser to http://localhost:8080/app.
This file contains hidden or bidirectional Unicode text that may be interpreted or compiled differently than what appears below. To review, open the file in an editor that reveals hidden Unicode characters.
Learn more about bidirectional Unicode characters
The genuine reason we created this simplistic video platform is to have a software where we can explore the computation at the edge. The next post will be empowering the Nginx front end with Lua code to add features to NOTT, things like authentication and IP acl.
Learn how Linux/FFmpeg C partial codebase is organized to be extensible and act as if it were meant to have “polymorphism”. Specifically, we’re going to briefly explore how Linux concept of everything is a file works at the source code level as well as how FFmpeg can add support fast and easy for new formats and codecs.
Good software design – Introduction
To write useful and long term maintainable software we tend to look out for patterns and group them into abstractions and it seems that’s the case for devs behind Linux and FFmpeg too.
Software design
When we’re creating software, we’re building data structures and defining their behaviors and dependencies. The way we create and link them can be seen as the design/architecture of the software.
Let’s say we’re building a media framework that encodes/decodes video and audio. The codecs AV1, H264, HEVC, and AAC all do some common operations and if we can provide a generic abstraction that holds these common operations and data we can use this concept instead of relying on the concrete idea of what a specific codec does.
This is one of the ideas behind the good design for software, to rely on components that are weakly linked and with boundaries around what it should do.
Ruby
Maybe it’s easier to see all these concepts in practice. Let’s code a quick pseudo media stream framework that provides encoding and decoding for several codecs.
This file contains hidden or bidirectional Unicode text that may be interpreted or compiled differently than what appears below. To review, open the file in an editor that reveals hidden Unicode characters. Learn more about bidirectional Unicode characters
This pseudo-code in ruby tries to recreate what we’re discussing above, there is an implicit concept here of what operations a codec must have, in this case, the operations are encode and decode. Since ruby is a dynamically typed language any class can present these two operations and act as a codec for us.
Developers sometimes may use the words: contract, API, interface, behavior and operations as synonyms.
This design might be considered good because if we want to add a new codec we just need to provide an implementation and add it to the list, even the list could be built in a dynamic way but the idea is that this code seems easy to extend and maintain because it tries to keep link between the components weak (low coupling) and each component does only what it should do (cohese).
Rails framework even enforce some way to organize the code, it adopts the model-view-controller (MVC) architecture
Golang
When we go (no pun intended) to a statically typed language like golang we need to be more formal, describing the required types but it’s still doable.
This file contains hidden or bidirectional Unicode text that may be interpreted or compiled differently than what appears below. To review, open the file in an editor that reveals hidden Unicode characters. Learn more about bidirectional Unicode characters
The interface type in golang is much more powerful than Java’s similar construct because its definition is totally disconnected from the implementation and vice versa. We could even make each codec a ReadWriter and use it all around.
Clang
In the C language we still can create the same behavior but it’s a little bit different.
This file contains hidden or bidirectional Unicode text that may be interpreted or compiled differently than what appears below. To review, open the file in an editor that reveals hidden Unicode characters. Learn more about bidirectional Unicode characters
We first define the abstract operations (functions in this case) in a generic struct and then we fill it with the concrete code, like the av1 decoder and encoder real code.
Many other languages have somewhat similar mechanisms to dispatch methods or functions as if they were part of an agreed protocol and then the system integration code can deal only with this high-level abstractions.
Linux Kernel – Everything is a file
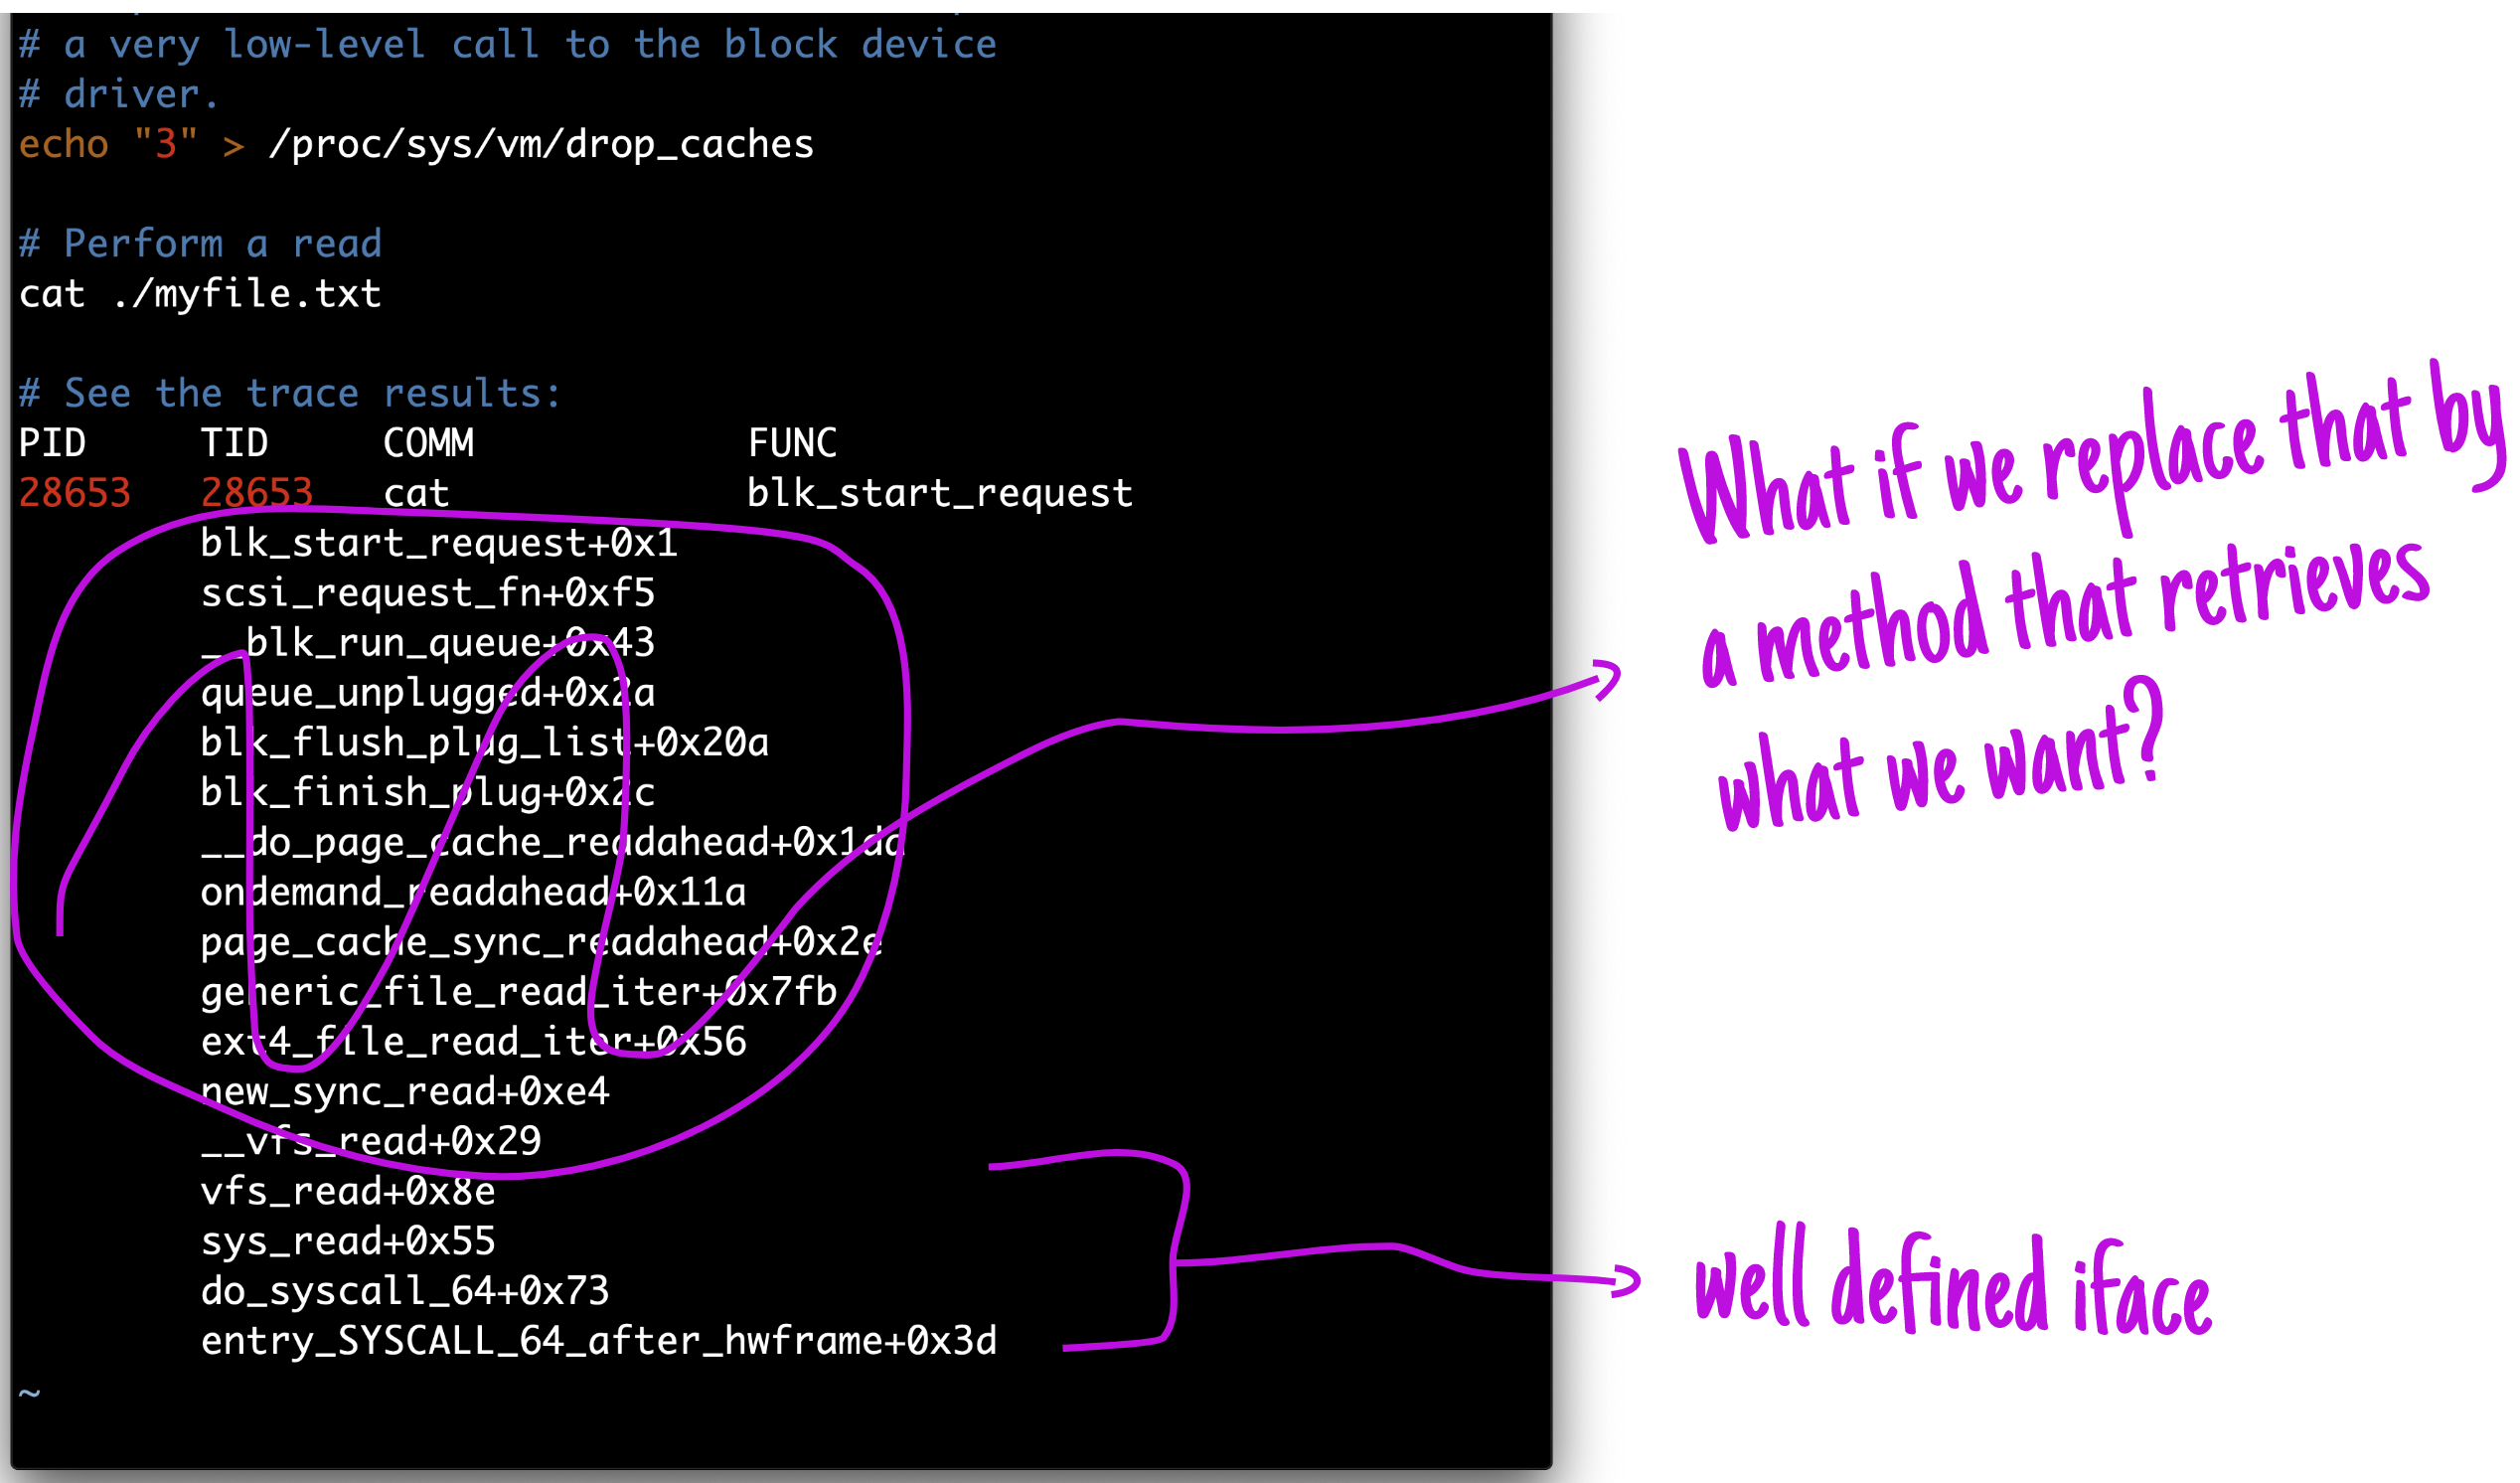
Have you ever heard the expression everything is a file in Linux? The idea is to have a common interface for all kinds of resources in Linux, for instance, Linux handles network socket, special files (like /proc/cpuinfo) or even USB devices as files.
This is a powerful idea that can make easy to write or use programs for linux since we can rely in a set of well known operations from this abstraction called file. Let’s see this in action:
This file contains hidden or bidirectional Unicode text that may be interpreted or compiled differently than what appears below. To review, open the file in an editor that reveals hidden Unicode characters. Learn more about bidirectional Unicode characters
This only is possible because the concept of a file (data structure and operations) was design to be one of the main way to communicate among sub-systems. Here’s a gist of the file_operations’ API.
This file contains hidden or bidirectional Unicode text that may be interpreted or compiled differently than what appears below. To review, open the file in an editor that reveals hidden Unicode characters. Learn more about bidirectional Unicode characters
The struct file_operations define what one should expect from a concept of what file can do.
This file contains hidden or bidirectional Unicode text that may be interpreted or compiled differently than what appears below. To review, open the file in an editor that reveals hidden Unicode characters. Learn more about bidirectional Unicode characters
This file contains hidden or bidirectional Unicode text that may be interpreted or compiled differently than what appears below. To review, open the file in an editor that reveals hidden Unicode characters. Learn more about bidirectional Unicode characters
And even the cpuinfo proc files is done over this abstraction. When you’re operating files under linux you’re actually dealing with the VFS system, this system delegates to the proper implementation file implemenation.
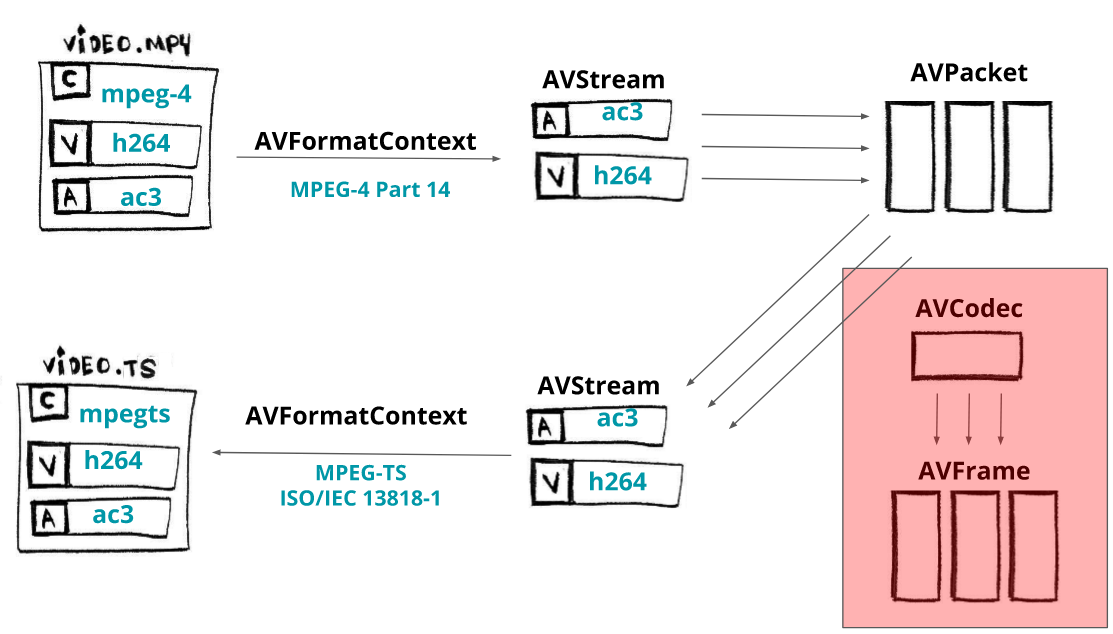
Here’s an overview of FFmpeg flow/architecture that shows that the internal componets are linked mostly to the abstract concepts like AVCodec but not directly to their implemenation, H264, AV1 or etc.
FFmpeg architecture view from transmuxing flow
For the input files, FFmpeg creates a struct called AVInputFormat that is implemented by any format (video container) that wants to be used as an input. MKV files fill this structure with its implementation as the MP4 format too.
This file contains hidden or bidirectional Unicode text that may be interpreted or compiled differently than what appears below. To review, open the file in an editor that reveals hidden Unicode characters. Learn more about bidirectional Unicode characters
This design allows new codecs, formats, and protocols to be integrated and released easier. DAV1d (an av1 open-source implementation) was integrated into FFmpeg May this year and you can follow along the commit diff to see how easy it was. In the end, it needs to register itself as an available codec and follow the expected operations.
This file contains hidden or bidirectional Unicode text that may be interpreted or compiled differently than what appears below. To review, open the file in an editor that reveals hidden Unicode characters. Learn more about bidirectional Unicode characters
No matter the language we use we can (or at least try to) build a software with low coupling and high cohesion in mind, these two basic properties can allow you to build easier to maintain and extend software.
At the last Globo.com’s hackathon, Lucas Costa and I built a simple Lua library to provide a distributed rate measurement system that depends on Redis and run embedded in Nginx but before we explain what we did let’s start by understanding the problem that a throttling system tries to solve and some possible solutions.
Suppose we just built an API but some users are doing too many requests abusing their request quota, how can we deal with them? Nginx has a rate limiting feature that is easy to use:
This file contains hidden or bidirectional Unicode text that may be interpreted or compiled differently than what appears below. To review, open the file in an editor that reveals hidden Unicode characters. Learn more about bidirectional Unicode characters
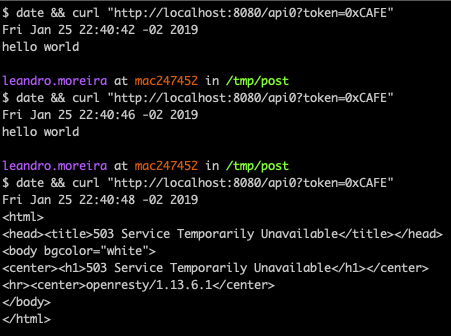
This nginx configuration creates a zone called mylimit that limits a user, based on its IP, to be able to only do a single request per minute. To test this, save this config file as nginx.conf and run the command:
This file contains hidden or bidirectional Unicode text that may be interpreted or compiled differently than what appears below. To review, open the file in an editor that reveals hidden Unicode characters. Learn more about bidirectional Unicode characters
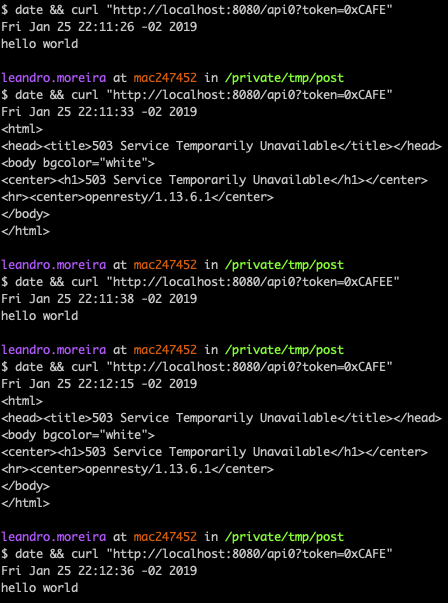
As you can see, our first request was just fine, right at the start of the minute 50, but then our next two requests failed because we were restricted by the nginx limit_req directive that we setup to accept only 1 request per minute. In the next minute we received a successful response.
This approach has a problem though, for instance, a user could use multiple cloud VM’s and then bypass the limit by IP. Let’s instead use the user token argument:
This file contains hidden or bidirectional Unicode text that may be interpreted or compiled differently than what appears below. To review, open the file in an editor that reveals hidden Unicode characters. Learn more about bidirectional Unicode characters
There is another good reason to avoid this limit by IP approach, many of your users can be behind a single IP and by rate limiting them based on their IP, you might be blocking some legit uses.
Now a user can’t bypass by using multiple IPs, its token is used as a key to the limit rate counter.
You can even notice that once a new user requests the same API, the user with token=0xCAFEE, the server replies with success.
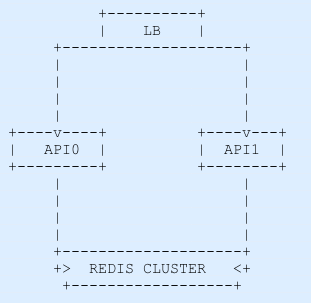
Since our API is so useful, more and more users are becoming paid members and now we need to scale it out. What we can do is to put a load balancer in front of two instances of our API. To act as LB we can still use nginx, here’s a simple (workable) version of the required config.
This file contains hidden or bidirectional Unicode text that may be interpreted or compiled differently than what appears below. To review, open the file in an editor that reveals hidden Unicode characters. Learn more about bidirectional Unicode characters
Now to simulate our scenario we need to use multiple containers, let’s use docker-compose to this task, the config file just declare three services, two acting as our API and the LB.
This file contains hidden or bidirectional Unicode text that may be interpreted or compiled differently than what appears below. To review, open the file in an editor that reveals hidden Unicode characters. Learn more about bidirectional Unicode characters
It’s weird?! Now our limit system is not working, or at least not properly. The first request was a 200, as expected, but the next one was also a 200.
It turns out that the LB needs a way to forward the requests to one of the two APIs instances, the default algorithm that our LB is using is the round-robin which distributes the requests each time for a server going in the list of servers as a clock.
The Nginx limit_req stores its counters on the node’s memory, that’s why our first two requests were successful.
And if we save our counters on a data store? We could use redis, it’s in memory and is pretty fast.
To implement the sliding window algorithm it’s actually very easy, you will keep two counters, one for the last-minute and one for the current minute and then you can calculate the current rate by factoring the two minutes counters as if they were in a perfectly constant rate.
To make things easier, let’s debug an example of this algorithm in action. Let’s say our throttling system allows 10 requests per minute and that our past minute counter for a token is 6 and the current minute counter is 1 and we are at the second 10.
last_counter * ((60– current_second) /60) + current_counter
6 * ((60– 10) /60) + 1 = 6 # the current rate is 6 which is under 10 req/m
This file contains hidden or bidirectional Unicode text that may be interpreted or compiled differently than what appears below. To review, open the file in an editor that reveals hidden Unicode characters. Learn more about bidirectional Unicode characters
INCR to count the current counter and retrieve its current value.
EXPIRE to set an expiration for the current counter, since it won’t be useful after two minutes.
We decided to not use MULTI operation therefore in theory some really small percentage of the users can be wrongly allowed, one of the reasons to dismiss the MULTI operation was because we use a lua driver redis cluster without support but we use pipeline and hash tags to save 2 extra round trips.
Now it’s the time to integrate the lua rate sliding window algorithm into nginx.
This file contains hidden or bidirectional Unicode text that may be interpreted or compiled differently than what appears below. To review, open the file in an editor that reveals hidden Unicode characters. Learn more about bidirectional Unicode characters
You probably want to use the access_by_lua phase instead of the content_by_lua from the nginx cycle.
The nginx configuration is uncomplicated to understand, it uses the argument token as the key and if the rate is above 10 req/m we just reply with 403. Simple solutions are usually elegant and can be scalable and good enough.
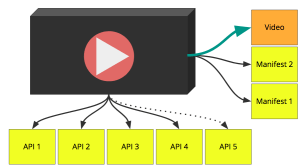
During our last hackathon, we wanted to make our playback to start faster. Before our playback starts to show something to the final users, we issue around 5 to 6 requests (counting some manifests) and the goal was to cut as much as we can.
The first step was very easy, we just inverted the code logic from the client side to the server side, and then we injected the prepared player on the page.
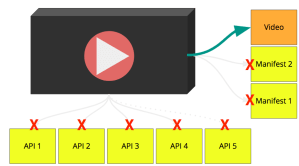
Okay, that’s nice but can we go further? Yes, how about to embed our manifests into our page?! It turns out that we can do that with the power of URL.createObjectURL, this API gives us an URL for a JS blob/object/file.
// URL.createObjectURL is pretty trivial
// to use and powerfull as well
var blob = new Blob(["#M3U8...."]
, {type: "application/x-mpegurl"});
var url = URL.createObjectURL(blob);
var mime = "application/x-mpegurl";
var manifest = {{ @main_manifest }};
var subManifests = {{ @sub_manifests }};
var subManifestsBlobURL = subManifest
.splitByURL()
.map(objectURLFor(content, mime));
var finalMainManifest = manifest
.splitByLine()
.map(content.replace(id, subManifestsBlobURL[id]))
.joinWithLines();
function objectURLFor(content, mime) {
var blob = new Blob([content], {type: mime});
return URL.createObjectURL(blob);
}
new Our.Player({
src: objectURLFor(finalMainManifest, mime)
})
We thought we were done but then we came up with the idea of doing the same process for the first video segment, the page now will weight more but the player would almost play instantaneously.
// for regular text manifest we can use regular Blob objects
// but for binary data we can rely on Uint8Array
var segment = new Uint8Array({{ segments.first }});
By the way, our player is based on Clappr and this particular test was done with hls.js playback which does use the fetch API to get the video segments, fetching this created URL works just fine.
The animated gif you see at the start of the post was done without the segment on the page optimization. And we just ignored the possible side effects on the player ABR algorithm (that could think it has a high bandwidth due to the fast manifest fetch).


You must be logged in to post a comment.