Behind the scenes of live streaming the FIFA World Cup 2018

Screen Shot 2018-07-13 at 5.01.13 PM

Globo.com, the digital branch of Globo Group, had the rights to do the online live streaming of the FIFA World Cup 2018  for the entire Brazilian national territory.

We already did this in the past and I think that sharing the experience may be useful for the curious minds that want to learn more about the digital live streaming ecosystem as well as for the people interested in how Brazil infrastructure and user’s demand behave in an event with this scale.

Before the event – Road to the world cup

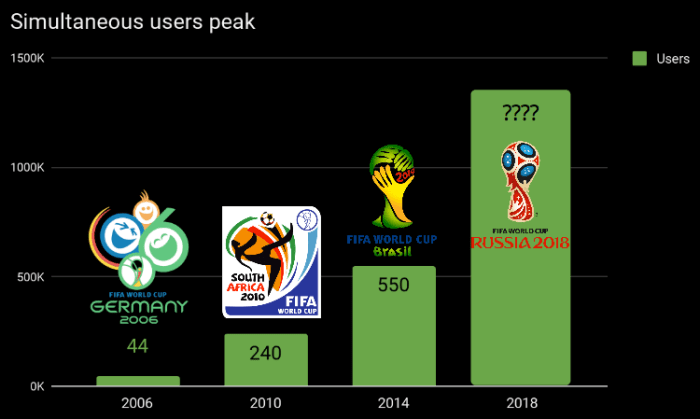
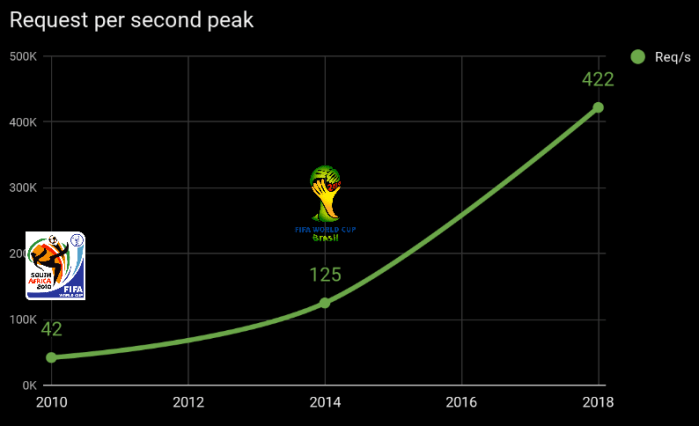
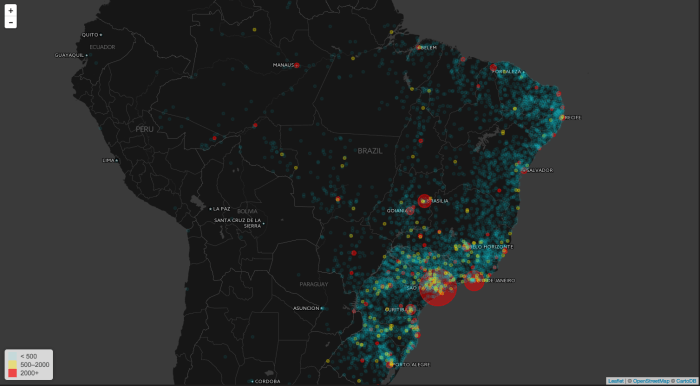
In average, we usually ingest and process about 1TB of video and users fetches around 1PB every single day. Even before the World Cup started, the live stream of a single soccer match had a peak of more than 500K simultaneous users with more than 400k requests per second.

When comparing these numbers to previous events such as the Olympic Games or the FIFA World Cup 2014 we can see an exponential evolution in demand.

Screen Shot 2018-07-13 at 5.00.44 PM

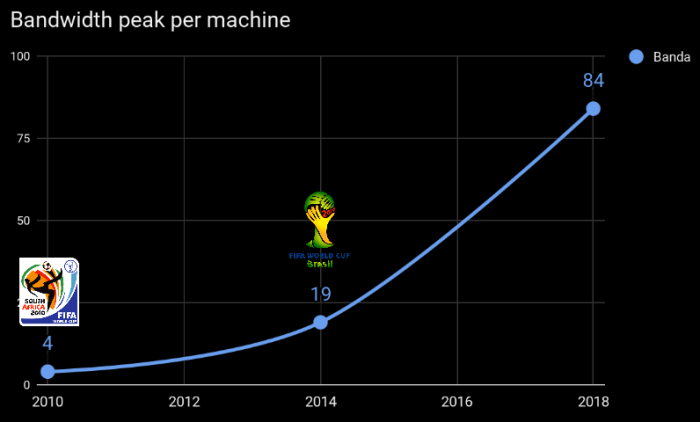
Back in 2014, Globo.com CDN was equipped with 20Gbps network interfaces. Now, the nodes were upgraded with 40Gbs, 50Gbs, and 100Gbps NICs. Processors were also upgraded enabling us to deliver 84Gbps on a single machine as part of the preparation for the World Cup.

I’m glad to say that the Linux/kernel fine-tune required was minimal since the newer kernel versions are very well tuned by default.

Screen Shot 2018-07-13 at 5.00.59 PM

We broke the simultaneous users record set by 2014 FIFA world cup way before the first 2018 World Cup matches. We also noticed an increase in the overall bitrate which likely point that the Internet infrastructure in Brazil improved significally in the past four years.

Plataform overview – The strategy 1:1:1

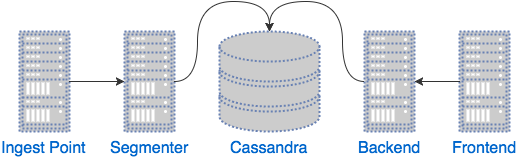
Let’s not focus on the workflow before the video arrives at our ingest encoders. Just think that it’s coming from Russia’s stadiums and reaching our ingest encoders directly. With this simplification in place, we can assume that there are basically two different users of interacting with the video platform: the ones producing the video and others consuming in the other end.

Screen Shot 2018-07-07 at 4.36.18 PM

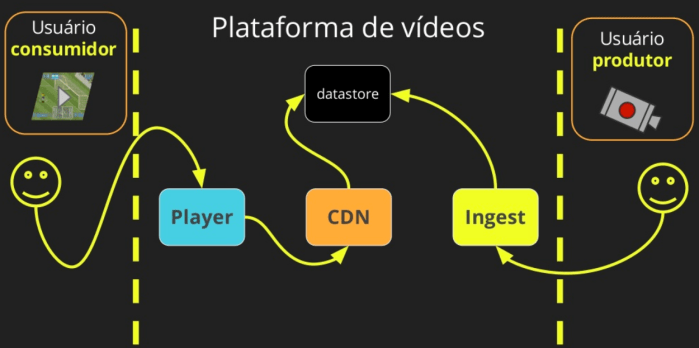
Consumers of the video are the visitors of our internet properties and they watch the live content throughout Globo.com video player, which is responsible for requesting video content to Globo.com’s CDN or one of our CDN partners.

Globo.com player is based on Clappr, an open source HTML5 player that uses hls.js and shaka as its core playback engines.

Globo.com CDN nodes are mostly built on top of  OSS projects such as Linux, Nginx (nginx-lua), Lua Programming Language and redis. Our origin is made of multiple ingest points and a mix of solutions such as FFmpeg, Elemental and  OBS. A Cassandra cluster is also deployed with the responsibility of storing and manipulating video segments.

OSS projects play a key role in all the initiatives we have within our technology and engineering teams. We also rely a lot on dozens of open source libraries and we try as much as we can to give stuff back to the community.

If you want to know how this architecture works you can learn from the awesome post: Globo.com’s live video platform for the 2014 FIFA World Cup

Constrained by bandwidth – Control the ball

The truth is: the Internet is physically limited, it doesn’t matter if you got more servers, in the end, if a group of users have a link to us of 10Gb/s that’s all we stream to them.

Or we can explore external CDNs more pops but I hope you got the idea! 🙂

In a big event, such as the World Cup, there will be some congestions on the link between our CDN and the final users, how we tackle this problem (of a limited bandwidth) can be divided into three levels:

  1. OS :: TCP congestion control – the lowest level to control the connection, when it’s saturated, this control is applied to each user.
  2. Player :: ABR algorithm – it watches metrics such as network speed, CPU load, frame drop among others to decide whether it should adapt to a better or the worst bitrate quality.
  3. Server :: group bitrate control – when we identify that a group of users, which uses the same link, are using a link that is about to saturate, we can try to help the player to use to a lower bitrate and accommodate more users.

During the event – Goals

Even before the knockout stage, we were able to beat all of our previous records, serving about 1.2M simultaneous users during this match. Our live CDN delivered, at its peak, about 700K requests/s and our worst response time was half a second for a 4 seconds video segment.

Some of our servers were able to reach (peak) 37Gb/s in bandwidth. We also delivered the 4K live streaming using HEVC with a delay of around 25 seconds.

We are constantly evolving the platform and looking at the bleeding edge technologies such as AV1. With the help of the open source community and the growing amount of talents on our technology teams, we hope to keep beating records and delivering the best experience to our users.

References

Olympic Games Rio 2016

TL;DR

Motivated by a friend, we’ll share bits of our experience during the Olympic Games Rio 2016. Before starting, I would like to clarify that Globo.com only had rights for streaming the content to Brazil.

We used around 5.5 TB of memory with 1056 CPU’s across two PoP’s located on the southeast of the country.

Screen Shot 2016-08-23 at 3.03.30 PM
Audience during the game BRA x SWE.


Not so long; I’ll read it

The live streaming infrastructure for the Olympics was an enhancement iteration over the previous architecture for FIFA 2014 World Cup.

Untitled Diagram (4)

The ingest point receives an RTMP input using nginx-rtmp and then forwards the RTMP to the segmenter. This extra layer provides mostly scheduling, resource sharing and security.

The segmenter uses EvoStream to generate HLS in a known folder watched by a python daemon and then this daemon sends video data and metadata to a cassandra cluster, which is used mostly as a queue.

Now let’s move to the user point of view. When the player wants to play a video, it needs to get a video chunk, requesting a file from our front-end, which provides caching, security, load balancing using nginx.

Network tip:

Modern network cards offers multiple-queues: pin each queue, XPS, RPS to a specific cpu.

affinity

When this front-end does not have the requested chunk it goes to the backend which uses nginx with lua to generate the playlist and serve the video chunks from cassandra.

Caching tip:

Use RAM to cache: a dual layer caching solution, caching the hot content (most current) on tmpFS and the colder content (older) on disk might decrease the CPU load, disk IOPS and response time.

You can find a more detailed view about the nginx usage at a two part article posted at nginx.com: caching and micro-services and a summary from Juarez Bochi.

This is just a macro view, for sure we also had to provide and scale many micro services to offer things like live thumb, electronic program guide, better usage of the ISP bandwidth, geofencing and others. We deployed them either on bare metal or tsuru.

In the near future we might investigate other adaptive stream format like dash, explore other kinds of input (not only RTMP), increase the number of bitrates, promote a better usage of our farm and distribute the content near of the final user.

Thanks @paulasmuth for pointing out some errors.

From LXC to docker-machine and cloudery

Attention: this post provides a very quick and simplistic (but functional) vision of the promised title.


In the beginning

Linux is a fantastic OS, it has more than we imagine and it still manages to get better. There is a feature called cgroups:

which provides a mechanism for easily managing and monitoring system resources, by partitioning things like cpu time, system memory, disk and network bandwidth, into groups, then assigning tasks to those groups

Let’s say we created a cgroup with: 50% of cpu, 20% memory, 2% of disk and a virtual network with 100% of bandwidth, now we can run our application under that cgroups restrictions.

Another cool feature of Linux is LXC (linux-containers):

which combines kernel’s cgroups and support for isolated namespaces to provide an isolated environment for applications

Now we’re able to provide a Linux machine capable of running multiple applications that run in isolation (like if there was an isolated OS for each application). This sounds like something we achieved with virtualization (app-level, os-level, cpu-level and so on) but faster and cheaper and without the overhead of running multiple kernels.

31-containers-vs-traditional-virtualization

Docker

Docker is:

an open-source project that automates the deployment of applications inside software containers, by providing an additional layer of abstraction and automation of operating-system-level virtualization on Linux. This is what Docker is but remember, it is not perfect.

The highlighted part is very interesting, docker will provide you a layer of abstraction that allows you to create and deploy your application within a container (an isolated, resource managed place to run processes) in a standardized way.

Docker machine, compose and so on

Life almost always get easier with abstractions, we (developers) don’t worry about how disks works (drivers) or even how a package left your pc and hit another one (we should know how this works :P). Our productivity had increased a lot since we relied on these abstractions.

And this is the same for the docker ecosystem, as we start to use it more often. We create best practices, solve issues with workarounds and etc, some of these will become part of the docker solution.

  • docker-machine: An application needs a machine to run regardless if it’s local, physical, virtual or in the cloud.
  • docker-compose: An application needs a way to declare its dependencies, either packages or distinct services like datastore.

Step 0: get ready

  1. If you’re on MacOS/Windows you’ll need to install VirtualBox or VMWare
  2. If you’re on MacOS/Windows install docker toolbox otherwise apt-get them all

Step 1: create the app

Let’s say we’ll create a rails 4 application with mongo.


rails new myapp –skip-active-record

view raw

bash.sh

hosted with ❤ by GitHub

Step 2: declare the app and its dependencies

We declare our dependencies by using two files: docker-compose.yaml and Dockerfile. In the Dockerfile we’ll describe how our machine should be (aka: all need packages and stuffs).


# we'll use an existent image which already have ruby installed
FROM ruby:2.3.0
# creating our app folder
RUN mkdir /myapp
# move to this folder
WORKDIR /myapp
# move the Gemfile to our app's root folder
ADD Gemfile /myapp/Gemfile
# move the Gemfile.lock too
ADD Gemfile.lock /myapp/Gemfile.lock
# updates the system gem
RUN gem update –system
# run bundle install for production
RUN bundle install –without development test
# copy my code's folder to myapp
ADD . /myapp

view raw

Dockerfile

hosted with ❤ by GitHub

Then we can move to its broad services dependencies, like database or even web server. We’ll use mongo as datastore and nginx as the web server.


# we'll call our web app of web
web:
# it'll build this container based the docker file ./Dockerfile
build: .
# it'll run this command to star the server
command: bash -c "rm -f tmp/pids/server.pid || true && bundle exec rails s -p 3000 -b '0.0.0.0'"
# it'll export the port 3000
ports:
"3000:3000"
# it links to db container (on mongoid.yaml at rail's config we say host: db:27017 it's linked)
links:
db
# we called our db container of db 🙂
db:
# instead of building it from zero we'll use an existent image (see docker hub)
image: mongo
# it needs to persist data so we keep it (even if we "kill" the container)
volumes:
/data/db
# we export the port 27017 :B
ports:
"27017:27017"
# we'll use nginx as web server
nginx:
# it'll restart when the container does too
restart: always
# we're going to build this container from docker file ./docker/nginx/Dockerfile
build: ./docker/nginx/
# we're gonna expose 80
ports:
"80:80"
# since we'll be a proxy we need to be linked to our web app (upstream= web:3000)
links:
web:web


# we'll build our container from an existent image 🙂
FROM nginx
# for some reason we need to create this folder
RUN mkdir -p /var/lib/nginx/proxy
# copy our app config to nginx
COPY sites-enabled/myapp.conf /etc/nginx/nginx.conf

view raw

Dockerfile

hosted with ❤ by GitHub


# we'll use 2 processors/core
worker_processes 2;
# we set a new limit for open files for our workers
worker_rlimit_nofile 100000;
# we define how we're going to work
events {
# for each worker we'll handle 4000 requests (enquee them)
worker_connections 4000;
# we'll accept multiple
multi_accept on;
# we'll use epoll as a IO event notification
use epoll;
}
# our server
http {
server_tokens off;
include /etc/nginx/mime.types;
default_type application/octet-stream;
access_log off;
open_file_cache max=200000 inactive=20s;
open_file_cache_valid 30s;
open_file_cache_min_uses 2;
open_file_cache_errors on;
sendfile on;
keepalive_timeout 30;
reset_timedout_connection on;
gzip on;
gzip_http_version 1.0;
gzip_proxied any;
gzip_min_length 500;
gzip_disable "MSIE [1-6]\.";
# we created that folder because we save our cache in there
proxy_cache_path /var/lib/nginx/proxy levels=1:2 keys_zone=backcache:8m max_size=50m;
proxy_cache_key "$scheme$request_method$host$request_uri$is_args$args";
proxy_cache_valid 404 1m;
# we'll forward request to our web app at 3000
upstream app_server {
server web:3000 fail_timeout=0;
}
server {
# listening at 80
listen 80;
# compreess it
gzip_static on;
gzip_http_version 1.1;
gzip_proxied expired no-cache no-store private auth;
gzip_disable "MSIE [1-6]\.";
gzip_vary on;
# some security precautions
client_body_buffer_size 8K;
client_max_body_size 20m;
client_body_timeout 10s;
client_header_buffer_size 1k;
large_client_header_buffers 2 16k;
client_header_timeout 5s;
keepalive_timeout 40;
# let's get rid of simple attackers GET /admin/setup.php ….
location ~ \.(aspx|php|jsp|cgi)$ {
return 404;
}
# let's try to serve static files otherwise forward to app
try_files $uri $uri/index.html $uri.html @app;
# app is a proxy to our web app
location @app {
proxy_set_header X-Url-Scheme $scheme;
proxy_set_header X-Forwarded-For $proxy_add_x_forwarded_for;
proxy_set_header Host $host;
proxy_redirect off;
proxy_pass http://app_server;
}
# let's serve error pages
error_page 500 502 503 504 /500.html;
location = /500.html {
root /myapp/public;
}
}
}

view raw

nginx.conf

hosted with ❤ by GitHub

Step 3: deploy it locally

We need to create a machine for it and then we need to run it.


# we'll create a "machine" called dev on virtualbox
docker-machine create –driver virtualbox dev
# let's use this machine
eval "$(docker-machine env dev)"
# let's take note of our docker-ip
docker-machine ip dev
# let's run this app
docker-compose up
# now go to your browser and type ip 🙂 it should show something

Step 4: deploy in the cloud

The same way we created a machine to run our app locally ,we can create any number of machines to run this application, even in cloud environment such as digitalocean, aws, azure, google and etc.

That’s it 🙂 for a more explained rails app docker workflow read this great post or yet a fresh new example of docker-compose.yaml.


# creating an amazon machine
docker-machine create –driver amazonec2 –amazonec2-access-key XXX –amazonec2-secret-key "xxxxx" –amazonec2-vpc-id vpc-xxx –amazonec2-zone Y amazon
# creating a digital ocean machine
docker-machine create –driver digitalocean –digitalocean-access-token=XXX do
# let's take note of our ip
docker-machine ip amazon
# let's deploy our application
docker-machine up

view raw

bob_ross.sh

hosted with ❤ by GitHub

// TODO: some things

Let’s suppose we just created a staging environment and another developer come to help us, it seems that there is no an official way to share our created machine (amazon, google app engine, azure, digital ocean…) with team members. There are some workarounds but it’ll be nice to see this becoming a feature.

Troubleshooting

  • Useful commands to troubleshooting, exploration and debug:
    • To enter on a machine: $ docker-machine ssh staging (either local or cloud)
    • To enter on a container: $ docker-compose run db bash (either local or cloud)
    • To list files within a container: $ docker-compose run db ls -lah data/db
    • To edit/add/remove data on mongo: $ mongo –host DOCKER_IP
  • If you face any error like E: Failed to fetch … during the docker-compose build try it again
  • If you face any error like “Error creating machine: Error running provisioning: Unable to verify the Docker daemon is listening: Maximum number of retries (10) exceeded” during any deployment, try to download docker-toolbox again and install it.

Google is your friend.